Today’s headline might well have carried the teaser: ‘(Near) East Meets West’. It’s an ‘obvi-ous’ idea that’s eluded most folks for more than 250 years. And one that might just change your concept of a grilled cheese sandwich forever!
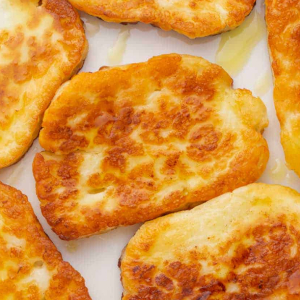
 Deluxe Halloumi Grilled Cheese Sandwiches: With pickles and shredded lettuce…
I was truly ‘gob-smacked’ (as the Brits say) when this one was first pointed out to me. “You’re going to hate yourself for not coming up with it first!” Sister Erin grinned as she handed me the print-out…
… And she was right
The first time I dined at an authentic Greek restaurant, I was thrilled to discover a whole new cuisine quite unlike any I had enjoyed previously. Until then – only about 15 years ago – I’d assumed Greek food was in many ways similar to Italian food. Perhaps something like a prototype. How wrong I was!
One of the most interesting and memorable dishes I tried that night was fried Halloumi.
Halloumi is a signature Greek Cheese. Suzy Karadsheh, proprietor of The Mediterranean Dish.com, describes it as a, “white, semi-hard, salty cheese, traditionally made from goat or sheep’s milk or a combination of both.”
She also commented that, “When eaten raw, halloumi, an unripened cheese, has a bit of rubbery, squeaky texture.” And she had my undivided attention. Because that description captured my own favourite aspect of fresh-made, unpressed, unripened Cheddar Cheese curds: That squeeky bite that defi9nes good Cheddar.
Halloumi facts
Halloumi can be cooked in several different ways – fried, baked or grilled – with correspondingly different results. Karadsheh covers all three methods in her comprehensive post. But She readily admits, the most common method to prepare this beautiful cheese is frying.
“This is [also] the quickest method and, when done right, yields amazing results in 5 minutes or less,” Karadsheh says. “You can fry halloumi in a nonstick pan with nothing else added. […] Or, my preferred method, pan fry halloumi sticks or slices in a bit of good olive oil over medium to medium-high heat.”
The higher the heat (within reason), the more likely you are to achieve a beautiful, flavourful, golden brown, slightly crisp finish on the slice. But de careful not to melt the cheese. A few seconds can mean the difference between a runny-edged mass, and a cohesive slice with a runny centre – which is what you’re aiming for.
When cooked perfectly, remove the Halloumi from the pan with a large enough spatula to properly support the whole slice. Place on toasted bread – or a roll – of your choice and serve immediately. Now THAT’s a grilled Cheese you’ll never forget!
Tips…
Don’t butter the outside surfaces of the bread slices you’re going use for your sandwich. Dry-toasting your bread separately lets you ditch the usual ‘greasy fingers’ factor that can make eating the love-liest grilled cheese a less-than-perfect experience.
DO cut nice thick slices of Halloumi – a little less than 1 cm is about right. But avoid going less than about 6 mm / 1/4 in. Too thin a slice will get too runnybefore the surfaces are properly finished.
Karadsheh doesn’t explicitly say so, but I suspect her Halloumi technique will work with other, similar cheeses, too. I’m going to experiment with young, or ‘new’ cheddar. If the cheese by itself doesn’t remain intact (i.e.- gets runny at the edges before the centre is melted), I’ll try lightly breading or flour-coating it. And I’ll start off at a lower temperature than might be ideal for more-heat-resistant halloumi.
My take
Once you’ve had a grilled cheese prepared in Karadsheh’s approved manner, you’ll never want to go back to the ‘traditional method, where you fry the whole sandwich.
And you’ll probably want to indulge in grilled cheese more often!
~ Maggie J.