Two words cooks love to hear when assessing new recipes: ‘No-Bake’. We thought, after discussing the pros and cons of America’s fave blue Fruit, we would suggest a wonderful, crave-crushing Blue-berry dessert perfect for Summer feasting, indoors or out!…
This one will also crush your best intentions to count Calories and limit added sugar. But it’s not as if you’re going to be eating it every day for a week…
Cook vs. prep
Don’t you just hate it, when you look deeper into a new recipe you’ve found that claims prep time is ‘just 15 minutes’… But discover that, when you add simmering / baking time, it’s more like an hour and 15 minutes?
That’s a ‘bait-and-switch’ tactic that can make a cook who’s planning an already ambitious menu for a special dinner scream out loud.
Nevertheless, if you keep looking, you can generally find something appropriate to take the lying, treacherous pretender’s place with just a little further effort.
But it shouldn’t be that way!
No disappointment here
You won’t be disappointed by the new no-bake Blueberry Cheesecake I uncovered while searching for no-bake Crumble and Crisp toppings, crusts, and sweet, crunchy ‘layers’…
And on top of the basic convenience of a no-bake recipe, This one offers multiple opportunities or cutting corners – and pep time – by using prepared supermarket products whose provenance you can easily conceal, if you want to!
What it is…
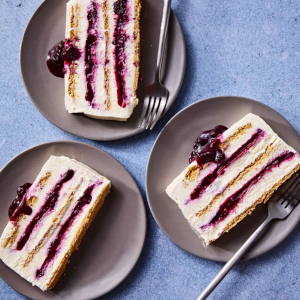
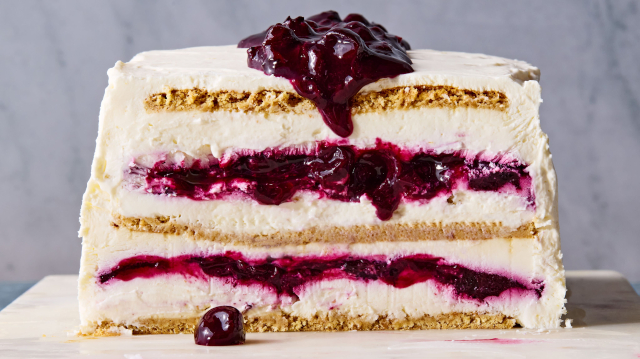
This layer-cake-approach cheesecake alternates thin layers of crushed cookies, whipped cream, and blueberry filling to create a tall, cool yummy slice of sheer joy. Your friends, family and other sundry guests will think you took all day to put it together!
Select a fairly deep cake pan, loaf pan or other suitably sized-and-shaped vessel – could be plastic, glass or whatever; it doesn’t go in the oven! – and line with heavy-duty plastic wrap.
Try to work quickly, keeping all mixtures in the fridge except when actually using them. Keep all lay-ering/spreading tools separate from one another so you don’t contaminate successive layers with remnants of previous ones.
Lay it on…
Start with a layer of Whipped Cream. Cheese mixture should also be used to apply a thin layer of ‘frosting’ to the sides of the pan.
The contributor of the original source recipe says a very small offset pastry spatula will be ‘your best friend’ for this operation. Next, create a similar layer in the bottom of the moulding vessel. Remem-ber, this will be the TOP of the finished cake when it’s unmoulded!
Next create a layer of the crackers as described in the source recipe. On top of that, add another layer of the whipped cream / cream cheese mix. Then, a layer of your blueberry filling. Repeat the layers. Even if there’s still room for more layers in the mould, make this your second, and last, full set of ‘internal layers’. The stack should now ‘read’ (from the bottom up): Cream / cookies / cream / berries/ cream / cookies / cream / berries.
On top of that, add a final layer of cream, followed by a final layer of cookies. This cookie layer will be the bottom ‘crust’ of the cake when you’ve unmoulded it.
Follow the instructions for chilling, unmoulding and slicing the finished cake.
Tips and tweaks
You can use a prepared, store-bought blueberry pie filing if you like. supplemented by a few handfuls of whole, fresh berries.
You can use factory-whipped cream cheese gently folded into your whipped cream for ‘cream’ layer.
You can use crushed cookies and softened butter for your cookies layer. It will form a more cohesive crust later, after the prescribed period of chilling.
My take
DO NOT be tempted to apply layers too thickly. They’ll be more difficult to slice without crushing and mushing when serving.
IF ANYTHING, refrigerate longer than recommended rather than rushing the chilling stages, to ensure you have a nice firm cake for slicing.
DO rely on this scrumptious dessert anytime you need an elegant finish for a special repast!
~ Maggie J.