Today we inaugurate a series of recipe posts reviving real old-fashioned dishes, the way they made them in your Grandma’s day. We’re literally mining the pages of the Domestic Science Text Books from Prairie High Schools of the 30s and 40s to bring you simple delights from an age when Lard was King!
 A Honkin’ Big Yummy, Juicy Breakfast Sandwich constructed on a
honkin’ good home-made Biscuit!
Don’t blow a gasket! We’re going to substitute Vegetable Shortening for Lard when called for in these recipes. Alas, it makes the results a little less authentic, but it’s the responsible thing to do. The rest of the ingredients we’ll encounter should already be in your pantry. Some things never change…
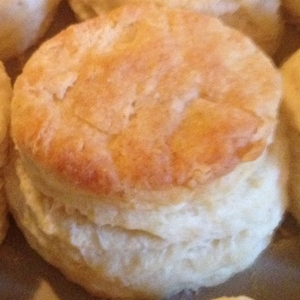
Let’s begin with a nice Biscuit!
Behold the humble baking Powder Biscuit – a classic of British cuisine and a mainstay of North American comfort food menus from the Arctic Circle to Key West. it has, in its many forms, filled many happy tummies but did you know it also opens the door to a whole book full of recipes?
The 1937 edition of Theory and Practice in Household Science, published by the Winnipeg Public Schools, makes a simple task of making your basic Quick Breads, starting with the most basic of those, the simple, yet wonderful Baking Powder Biscuit.
Here’s what you’ll need:
- 2 cup. Flour (All-Purpose)
- 4 tsp. Baking Powder
- 1/2 tsp. Salt
- 2 tbsp. Fat (You can use Shortening, Butter or Margarine – any fat that’s solid at room temperature
- 3/4 cup. Milk, Buttermilk or Water
Now, I prefer more Fat in my Biscuits (4 tbsp.) and I add an extra 1/2 tsp. of Baking Soda to help them rise. But remember, these recipes were designed to help young women learn to cook wholesomely under the conditions of the Great Depression when many foods – such as Fats and Leavenings – were scarce or costly. Fee Free to fiddle with the ingredients til you get exactly the result you want!
Here’s what to do:
Combine all the dry ingredients in a large mixing bowl. Chop in the fat with a Pastry Cutter or pinch in with your fingertips until the mixture looks like coarse meal.
Add milk or Water stirring with a Spurtle or the handle of a Wooden Spoon until you have a smooth, firm Dough (Not too firm! the Biscuits won’t rise if they’re too heavy.)
Turn out onto a Floured board and sprinkle generously with Flour to coat the Dough Ball all over. Roll or pat out to a thickness of 1/3 in. (2 cm). Cut out Biscuits with a biscuit cutter, drinking glass of appropriate circumference or cookie Cutter. Mom always used the Drinking Glass, well Floured so the Biscuits didn’t stick.
Arrange Biscuits on a baking tray or place closely together in a high-sided Cake pan (if you like ’em to rise and expand together pushing each other up!)
Brush with Milk or Butter to ensure the tops come out glazed and golden…
Bake at 400 to 425 for 10 – 15 min. or until golden on top and fully risen.
Enjoy!
The underlying lesson…
If you read page 93 pf the 1937 edition, you immediately note that the Baking Powder Biscuit recipe takes up only about 1/4 of the page. Thge rest is taken up with ‘Variations’ including Short Cake, Scones, Cinnamon Rolls, Date & Nut Cake and Dutch Apple Cake. Yep, that’s right! They’re all just variations and embellishments of the basic Biscuit Recipe.
This underlines my contention, often stated in this space, that cooking is less about following recipes than it is about mastering Techniques. In this case, the Biscuit Technique.
Once you’ve got the basic Technique down, you’ve got a whole class of recipes nailed!
Go for it!
~ Maggie J.