Poultry requires special handling on the smoker. And special prep by way of marinating, brining and basting. It may seem like overkill, but if you take the time and effort to do it all right, you’ll be oh, so glad you did!
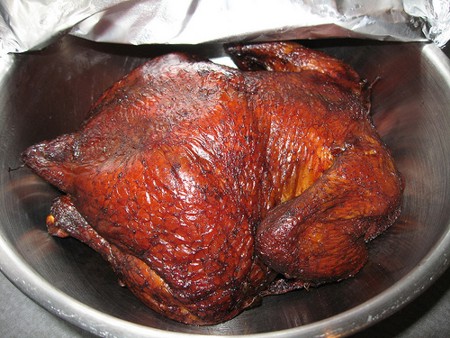
 This beautiful example of a whole Smoked Chicken courtesy of the pros at
Di Antonio’s Catering, Phillie, PA. Note the beautiful mahogany colour
and the post-cooking foil cover, to keep in the moisture.
Smoked Chicken or Turkey or Duck can be something close to a religious experience – if you do it right!
And ‘doing it right’ doesn’t mean slathering cold, raw Chicken with overly-sweet ‘BBQ Sauce’ and throwing it on an overheated grill!
You want light smoke, a juicy interior, a mahogany finish and absolutely no hint of carbonized sugars!
How do you get from the supermarket to your table taking the charcoal-paved High Road? Follow a few simple steps and exercise a little patience. And plan ahead. Because doing poultry right on the smoker means starting your prep a couple of days in advance.
Stage one – The Meat
Always use fresh – not frozen – poultry, if you can. It’s not as easy with Turkey or Duck, which fall within the realm of ‘specialty’ and ‘seasonal’ products. But they’re bigger than Chickens and tend to retain their moisture better after being frozen. Poultry on the bone is better for grilling and smoking than boneless. You are going to cook low and slow and the bones will help equalize the flow of heat within the meat.
Do not remove the skin from the Chickens, or Chicken parts to allow best retention of moiature, and the seasonings and marinades you apply. Then take the following steps, starting two days before you plan to cook.
Treatment the First: Brining. Day One. Dissolve one cup of Kosher salt in 4 L (1gal.) of Water for each whole Chicken or the equivalent mass in Chicken parts. Place the Chicken in a large plastic tub or stock pot and cover with the salt solution, or brine. Toss in a dozen peppercorns, some springs of fresh Thyme and Rosemary, and a couple of Bay Leaves. Place the container in a fridge for 24 hours. Also on the first day, place more fresh Thyme and Rosemary, a dozen or so Peppercorns and some Dry White Wine or Lemon Juice, in some good Olive Oil and let sit, covered, in a tightly-closed container like a preserving jar, for 24 hours.
Treatment the Second: Marinating. Day Two. Remove the Chicken from the brine and dry using clean cotton towels or heavy-duty paper towels. This is important for a good skin finish. Then brush on the marinade, leaving the herbs in the new container with the well-oiled Chicken. Let rest for another 24 hours. Then, it’s Fire Day!
Treatment the Third: Cooking. Classic low and slow. And be careful not to overdo the smoke, if you do it at all. Some folks just prefer an old fashioned golden finish on their grilled chicken. But they’re missing out on some great flavour!
For smoking, we recommend you start with charcoal for heat and add a controlled amount of Apple or Maple chips or chunks. Use indirect heat. Make your temperature about 225 F. And let it go for two or three hours, until the internal temperature in the thickest part of the breast and thigh reaches at least 170 F. Spray with Apple Juice at half hour intervals throughout cooking. Brush or mop with a complementary finishing sauce. You can go sweet or spicy according to your taste, Just keep in mind the flavours you used in brining and marinating and go with that flow.
Finishing touches
When the chicken is done, remove from the grill and wrap in heavy aluminum foil. Let rest for at least 20 minutes before serving to ensure that all its flavourful juices are retained when your lucky family and guests cut into their delicious entrée!
And congratulate yourself for making an extra-special treat out of what might otherwise have been a humdrum, everyday piece of baked or fried chicken!
~ Maggie J.
